Signs, Signals, and Codes Merit Badge
Free Resources and Answers
The Signs, Signals, and Codes merit badge helps Scouts learn how people share messages without speaking. This includes ways to send information with hand signs, lights, flags, sounds, or written symbols. These methods can be used in emergencies, in sports, or even for fun. Scouts will explore many ways to communicate clearly.
Scouts who work on the Signs, Signals, and Codes merit badge learn how to understand and use different forms of signaling. They try out methods like Morse code, American Sign Language, semaphore, braille, and more. Some are used for safety. Others are used to help people with different needs or in special settings.
The Signs, Signals, and Codes merit badge also teaches how to follow and make trail signs. Scouts learn what different signs mean and how to use them safely in the outdoors. They also look at common symbols used every day like traffic signs or text message emojis. These signs help us share information quickly and clearly.
By working on the Signs, Signals, and Codes merit badge, Scouts build useful skills they can use in real life. These skills help in emergency situations, outdoor adventures, and teamwork. Learning different ways to send messages helps Scouts become better problem-solvers and leaders.
Signs, Signals, and Codes Merit Badge Requirements and Workbook

Signs, Signals, and Codes Merit Badge Requirements
Signs, Signals, and Codes Merit Badge Pamphlet
Signs, Signals, and Codes Merit Badge Workbook / Worksheet
Signs, Signals, and Codes Merit Badge Printable Requirement Check Off Sheet
Signs, Signals, and Codes Merit Badge Answers and Resources
Help with Answers for Signs, Signals, and Codes Merit Badge Requirements
Find specific helps for some of the Signs, Signals, and Codes Merit Badge requirements listed below. Some of these resources will just give the answers. Others will provide engaging ways for older Scouts to introduce these concepts to new Scouts.
- Requirement 1: Why We Signal
- Requirement 2: Emergency Signaling
- Requirement 3: Morse and ASL
- Requirement 4: Semaphore and Flags
- Requirement 5: Braille Basics
- Requirement 6: Sound and Silent Signals
- Requirement 7: Trail Sign Hike
- Requirement 8: Action Signals
- Requirement 9: Everyday Symbols
- Requirement 10: Secret Codes
- More Resources
Requirement 1: Why We Signal
Discuss with your counselor the importance of signs, signals, and codes, and why people need these different methods of communication. Briefly discuss the history and development of signs, signals, and codes
Signs, Signals, and Codes Merit Badge Requirement 1 Helps and Answers
Why Communication Methods Matter
The Signs, Signals, and Codes merit badge begins with a big idea: communication can happen in many ways, not just by talking. Signs, signals, and codes help people share information, even when they are far apart, can’t speak, or are in danger. They are useful in emergencies, in quiet places like nature, or when helping someone with a disability. Different situations need different ways to get a message across.
This kind of communication has been around for a long time. Long ago, people used hand gestures to give warnings or instructions. Then came fire signals, smoke signals, and drumbeats. These could send messages over long distances. In ancient times, some cultures used smoke or mirrors to flash messages across great distances. These systems only worked if people agreed on what the signal meant.
As tools and technology improved, people created more complex codes. One example is the semaphore system, where arms or flags are moved into different positions to stand for letters. Another is Morse code, which uses a system of short and long signals. These methods helped armies, sailors, and messengers send information fast and safely. Morse code was later used in telegraph systems, helping people send messages using electricity.
Today we still use many of these older systems, especially in Scouting. The Signs, Signals, and Codes merit badge helps Scouts learn how these methods work and when to use them. You learn about safety, teamwork, and how to get a message across when words won’t work. These are skills that can help you in the wilderness, in a group, or even during an emergency.
Requirement 2: Emergency Signaling
Explain the importance of signaling in emergency communications. Discuss with your counselor the types of emergency or distress signals one might use to attract airborne search-and-rescue personnel if lost in the outdoors or trying to summon assistance during a disaster. Illustrate these signalling examples by the use of photos or drawings.
Signs, Signals, and Codes Merit Badge Requirement 2 Helps and Answers
Getting Help When It Matters
One of the most important reasons to learn about signs, signals, and codes is to know how to ask for help in an emergency. The Signs, Signals, and Codes merit badge teaches Scouts how to use simple tools to signal for rescue when phones and radios are not available. If you are lost in the woods, stuck after a storm, or in trouble during a hike, knowing how to attract attention can help searchers find you quickly.
In an emergency, you want to be seen or heard. A whistle is a great tool. Three short blasts is the universal distress signal. It tells others that you need help. Shouting is not as good because it doesn’t carry as far and you can lose your voice. If rescuers are far away, they may not hear you, so you also need ways to be seen from above.
Air rescue teams look for people from helicopters or airplanes. That’s why visible signals are so important. You can make ground-to-air symbols using rocks, logs, gear, or even your backpack. Make shapes that stand out against the ground. Here are some ground-to-air common signals:
- V – Need assistance
- X – Need emergency help
- Y – Yes (affirmative)
- N – No (negative)
- → – Proceeding in this direction
- I – I am injured
- L – All is well
- F – Need food and water
- W – Need medical supplies
- SOS – International distress signal (can be written or signaled as three short, three long, three short)
These are passive signals. Once set up, they stay in place without needing more action. Make the shapes as large as possible—at least 10 feet tall—so rescuers in the air can see them clearly. Use bright colors if possible. Here are some common ground-to-air symbols used to signal aircraft during a search-and-rescue operation.
You can also use motion. Moving objects catch the eye better than still ones. If you have something bright like an orange poncho or space blanket, wave it. You can hang it in a tree or set it up on a tripod. If it moves in the wind, that helps searchers spot it. If you have a mirror, you can flash light at a plane or helicopter. A flash from a mirror can be seen miles away.
Smoke signals work during the day. If it is safe, build a small fire and then add green leaves or grass to make thick smoke. At night, a campfire in a clearing is your best signal. Be careful not to start a wildfire. Always be sure you can control the fire and have a safe space around it. Only use fire if you really need help and it’s your best option.
The Signs, Signals, and Codes merit badge also reminds Scouts not to wander if they are lost. The best thing is to stay in one place after you realize you are lost. Rescuers can’t help you if you keep moving. Make your signals clear, visible, and easy to understand. Don’t make confusing signs or leave too many in different places.
By learning emergency signaling through the Signs, Signals, and Codes merit badge, you gain a skill that could save your life or someone else’s. It helps you stay calm and take smart action in a scary situation. And as Scouts, being prepared is what we do.
Requirement 3: Morse and ASL
Do the following:
- Describe what Morse code is and the various means by which it can be sent. Spell your first name using Morse code. Send or receive a message of six to 10 words using Morse code.
- Describe what American Sign Language (ASL) is and how it is used today. Spell your first name using American Sign Language. Send or receive a message of six to 10 words using ASL.
Signs, Signals, and Codes Merit Badge Requirement 3 Helps and Answers
Learn to Send a Message
Morse code is a way to send messages using short and long signals. These are called dots and dashes. A dot is short. A dash is three times longer than a dot. Each letter and number has its own set of dots and dashes. For example, the letter A is a dot followed by a dash. That looks like this: • —. The Signs, Signals, and Codes merit badge teaches Scouts how to send and read messages using Morse code.
Morse code was invented by Samuel Morse. He used it with the electric telegraph, which sent signals through wires. The telegraph would beep short or long pulses that could be written down as dots and dashes. People would then decode the message by matching the patterns to letters. Morse code helped people send messages quickly across long distances before phones and computers existed.
Here is the full Morse code alphabet for letters A to Z and numbers 0 to 9:
A • —
B — • • •
C — • — •
D — • •
E •
F • • — •
G — — •
H • • • •
I • •
J • — — —
K — • —
L • — • •
M — —
N — •
O — — —
P • — — •
Q — — • —
R • — •
S • • •
T —
U • • —
V • • • —
W • — —
X — • • —
Y — • — —
Z — — • •
Numbers
1 • — — — —
2 • • — — —
3 • • • — —
4 • • • • —
5 • • • • •
6 — • • • •
7 — — • • •
8 — — — • •
9 — — — — •
0 — — — — —
You can send Morse code in many ways. You can use sound, like a buzzer, bell, or whistle. You can use light, like a flashlight or mirror. You can even wave a flag or raise and lower your hand. The key is to make sure the person receiving the message knows when you are sending a dot and when you are sending a dash. Timing and spacing are important. A pause between dots and dashes helps people know where one letter ends and another begins.
A simple message in Morse code might be: “scouts help others.” This can be sent by tapping, flashing light, or waving a flag. Try saying it out loud using “di” for dot and “dah” for dash. You can also write it down as a string of dots and dashes and let a friend decode it. The Signs, Signals, and Codes merit badge gives you a chance to try both sending and receiving.
To practice, start with one word at a time. Send the message slowly. Don’t worry about speed. The goal is to be accurate. If your friend cannot understand, send the word again. You can also copy the message and decode it letter by letter. This helps you get better at both sides of the skill.
Learning Morse code is fun and useful. You can use it in Scouting activities or during emergencies. If your voice can’t be heard, Morse code gives you another way to send a message. Scouts who earn the Signs, Signals, and Codes merit badge learn how to use this skill to help others and be ready in any situation.
Talking with Your Hands
American Sign Language, or ASL, is a visual language. It is used by people who are deaf or hard of hearing to talk with others. Instead of using sound, ASL uses hand shapes, movements, and facial expressions. Just like spoken languages, ASL has its own grammar and rules. It is not the same as English. It is a full language on its own. The Signs, Signals, and Codes merit badge introduces Scouts to ASL as one way people share messages without speaking.
ASL has been used in the United States for about 200 years. It started when Thomas Gallaudet brought sign language ideas from France. He helped open a school for the deaf in 1817. ASL grew as students and teachers shared signs. Over time, it became the main sign language used in American deaf communities. Many schools, churches, and families use ASL today to include everyone in conversations.
To use ASL, you make signs with your hands. Each word or idea has a different sign. The way you move your hands and where you place them matters. Some signs also include facial expressions. This helps show feelings and adds meaning. For example, raising your eyebrows can turn a sign into a question. Some words don’t have a specific sign, so you spell them using the fingerspelling alphabet.
Fingerspelling uses one hand to form each letter of a word. This is useful for names and short words. Here is how to spell the name Jack in American Sign Language:
- J: draw a J in the air with your pinky
- A: fist with thumb on the side
- C: hand shaped like the letter C
- K: two fingers up and thumb touching the middle one
You can learn about online tools to help you learn ASL and see the signs for words you enter here.
To practice ASL, you can send a message like, “We meet at camp next Saturday.” You would sign each word or fingerspell words you don’t know how to sign yet. The Signs, Signals, and Codes merit badge encourages Scouts to both send and receive messages using ASL. This helps build understanding and shows respect for people who use sign language every day.
Learning ASL is a good skill for Scouts. It helps you communicate with others in quiet places, like during a flag ceremony or wildlife hike. It also helps you include everyone, even those who can’t hear. If you use ASL clearly and with care, others will be able to understand you. And like all good communication, practice makes you better.
By working on this part of the Signs, Signals, and Codes merit badge, you are learning how to be helpful and prepared. You may not use ASL every day, but knowing it gives you another way to connect with people and serve others. That is a big part of being a Scout.
Requirement 4: Semaphore and Flags
Give your counselor a brief explanation about semaphore, why it is used, how it is used, and where it is used. Explain the difference between semaphore flags and nautical flags. Then do the following:
- Spell your first name using semaphore. Send or receive a message of six to 10 words using semaphore.
- Using illustrations or photographs, identify 10 examples of nautical flags and discuss their importance.
Signs, Signals, and Codes Merit Badge Requirement 4 Helps and Answers
Flag Signals That Speak
Semaphore is a way to send messages by holding two flags in different positions. Each position stands for a letter of the alphabet. You hold one flag in each hand and move your arms into set angles to spell out words. The Signs, Signals, and Codes merit badge teaches Scouts how to use semaphore to share messages clearly and quickly over short distances.
Semaphore is used when voice or sound can’t be heard. It is helpful on windy days, across fields, or on ships. It works best when both people can see each other clearly. Each letter has a unique flag position, based on clock-face angles. For example, to signal the letter A, the left arm points straight down and the right arm points up at a 45-degree angle.
To use semaphore, you need open space, good light, and someone watching you from a distance. You wave both flags to get their attention, then start spelling your message. Be sure to pause between words using a special rest signal. The person watching will write down each letter to read the message. This system is still used by the Navy and by some Scout groups during activities or ceremonies.
Semaphore flags are usually square and divided into two colors, like red and yellow or blue and white. These colors make it easier to see the flag positions. The flags are attached to short poles to help you hold them steady. In some cases, Scouts learn to use semaphore without flags, just by using arm positions.
Nautical flags are different. Each nautical flag stands for a single letter, but they are not used in pairs. These flags are flown on ships to share messages like “diver in the water” or “need assistance.” Each one has its own design and color. Unlike semaphore, nautical flags are hung up on lines, not held in the hands.
The key difference is this: semaphore uses two flags moved into different positions to spell out each letter, while nautical flags each represent one letter on their own and are used for fixed meanings or to spell words. Both are visual systems that rely on color and shape, but they are used in different ways.
Scouts working on the Signs, Signals, and Codes merit badge learn both types of flags. By practicing semaphore, you gain skills in clear signaling, teamwork, and attention to detail. These skills are useful in many Scout activities, especially in outdoor and emergency settings.
Spelling with Flags
Semaphore is a signaling system that uses two flags to send letters one at a time. The flags are held in different positions to represent each letter of the alphabet. Each position looks like a hand on a clock. You move your arms into the correct angle to spell out a message. Semaphore is quiet and simple. The Signs, Signals, and Codes merit badge teaches Scouts how to use semaphore to send messages clearly over a short distance.
Semaphore is often used when it’s too loud to talk or when you need to send a message across a field or a body of water. The signaler uses two square flags. These flags are usually red and yellow. They are attached to short poles to make them easier to hold. The person receiving the message watches the flag positions and writes down each letter.
Here is the complete semaphore alphabet. Each letter is shown as a clock-face position using the left and right arms. The signaler holds one flag in each hand and stands facing the receiver.
This chart is helpful when working on the semaphore portion of the Signs, Signals, and Codes merit badge. You can also download a printable PDF copy.
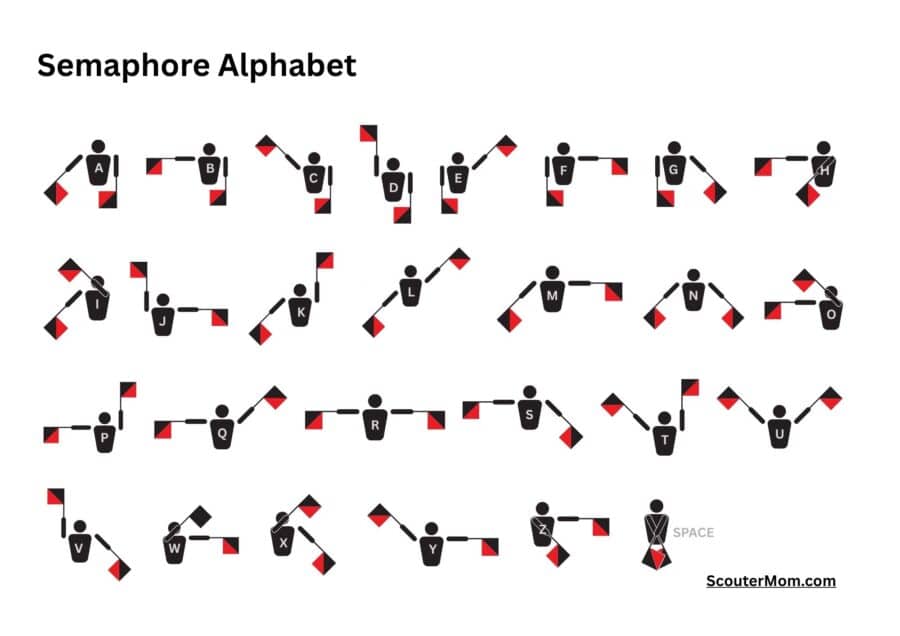
Each of these flag angles stands for a different letter. When spelling your name, pause slightly between each letter so the person watching knows when one letter ends and the next one starts. Between words, use the rest signal—bring both flags down in front of you to show a space.
You can send a message like “We will meet after lunch” using semaphore. Move smoothly from one letter to the next. Don’t rush. It’s better to be clear than fast. If the receiver doesn’t understand a letter, they can signal “IMI,” which means “Please repeat.” You can then resend that word or letter.
It helps to have a buddy to practice with. One Scout sends the message while the other writes it down. Then switch roles. That way, both Scouts learn how to send and how to receive messages using semaphore.
By learning this skill as part of the Signs, Signals, and Codes merit badge, you become better at quiet communication. This is useful in games, during ceremonies, and in outdoor activities where shouting isn’t a good idea. Semaphore is one of the traditional Scout skills that helps you be prepared.
Colorful Flags That Speak at Sea
Nautical flags are used by boats and ships to send messages. These flags are square or pennant-shaped and use bright colors, simple shapes, and patterns that can be seen from far away. Each flag stands for a letter in the alphabet, but some also have special meanings. Ships use them to communicate with other ships, harbors, or people on shore. In the Signs, Signals, and Codes merit badge, Scouts learn how to recognize these flags and understand their use.
Each flag is part of the International Code of Signals. This system helps ships talk to each other without using radios. For example, a ship might raise a flag to show it needs help or has a diver in the water. Sometimes, several flags are used together to spell out words or names. But in many cases, a single flag sends a complete message.
Here are examples of nautical flags and what they mean:
- A (Alpha) – White and blue; “I have a diver down. Keep well clear.”
- B (Bravo) – Solid red; “I am carrying or loading dangerous cargo.”
- C (Charlie) – Blue, white, red (vertical stripes); “Yes” or “Affirmative.”
- D (Delta) – Yellow and blue (horizontal stripes); “Keep clear. I am maneuvering with difficulty.”
- E (Echo) – Red with a blue square; “I am altering my course to starboard (right).”
- F (Foxtrot) – White with red diamond; “I am disabled. Communicate with me.”
- G (Golf) – Blue and yellow vertical stripes; “I need a pilot.”
- H (Hotel) – White and red vertical halves; “I have a pilot on board.”
- I (India) – Yellow with a black circle; “I am altering my course to port (left).”
- J (Juliet) – Blue, white, and red (horizontal stripes); “I am on fire and carrying dangerous goods. Stay clear.”
- K (Kilo) – Yellow and blue (divided diagonally); “I wish to communicate.”
- L (Lima) – Yellow and black checkered; “Stop your ship immediately.”
- M (Mike) – Blue with a white X; “My ship is stopped and not moving.”
- N (November) – Blue and white checkered; Used with Charlie for “No” or “Negative.”
- O (Oscar) – Yellow and red (diagonal); “Man overboard.”
- P (Papa) – Blue with white square center; “All personnel return to ship.” (Harbor use)
- Q (Quebec) – Solid yellow; “My ship is healthy. I request free pratique (entry to port).”
- R (Romeo) – Red with yellow cross; No special meaning in International Code, but used for port operations.
- S (Sierra) – White with blue square center; “I am moving astern (backing up).”
- T (Tango) – Red, white, and blue (vertical stripes); “Keep clear. I am trawling.”
- U (Uniform) – Red and white quarters; “You are running into danger.”
- V (Victor) – White with red X; “I require assistance.”
- W (Whiskey) – Blue with white square center; “I require medical assistance.”
- X (X-ray) – White with blue cross; “Stop what you’re doing and wait for instructions.”
- Y (Yankee) – Yellow and red diagonal stripes; “I am dragging my anchor.”
- Z (Zulu) – Blue, yellow, red, black triangles; “I require a tug.”
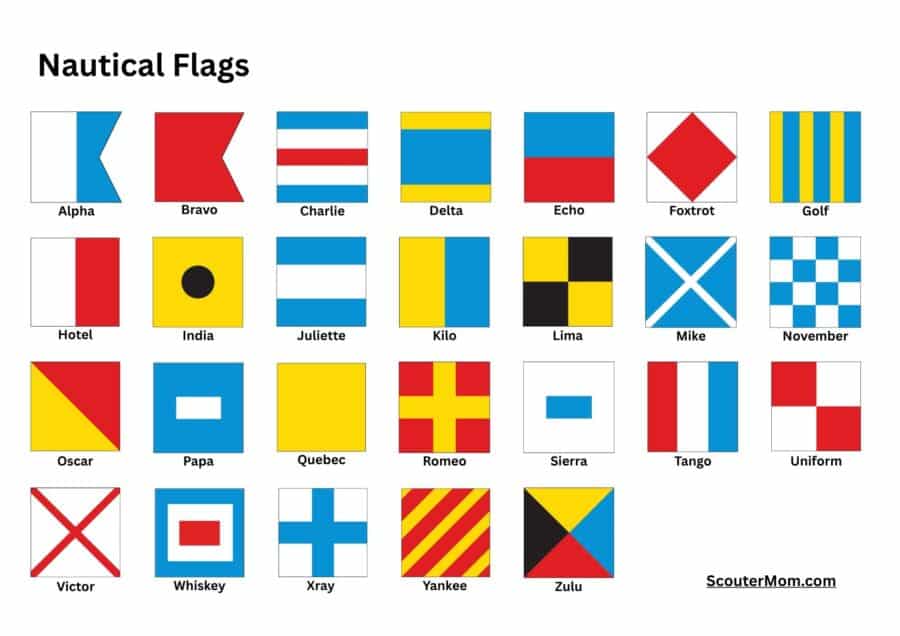
Download a PDF copy of the Nautical Flags chart here.
These flags are flown from lines or poles on the ship. Sometimes they are used during ceremonies or holidays as decoration, but most of the time they help with safety. For example, the Alpha flag warns others to stay away when someone is diving. The Oscar flag is raised quickly if someone falls into the water so others can help fast.
Scouts working on the Signs, Signals, and Codes merit badge can look at pictures or printed illustrations of these flags to learn their patterns and meanings. You might find posters at a marina, pictures in the pamphlet, or even images online (with a parent’s help). It’s a fun way to learn how ships talk without saying a word.
Knowing these flag meanings is useful if you’re ever near boats or in a coastal area. The flags give clear signals to help prevent accidents and save lives. For Scouts, learning how to read these signs is one more step in being prepared and aware.
Requirement 5: Braille Basics
Explain the braille reading technique and how it helps individuals with sight impairment to communicate. Then do the following:
- Either by sight or by touch, identify the letters of the braille alphabet that spell your name. By sight or touch, decode a braille message at least six words long.
- Create a message in braille at least six words long, and share this with your counselor.
Signs, Signals, and Codes Merit Badge Requirement 5 Helps and Answers
Reading with Your Fingers or Eyes
Braille is a system of raised dots used by people who are blind or have low vision to read and write. Each letter, number, or symbol is made by arranging one to six dots in a small rectangle called a braille cell. The dots are read by feeling them with the fingertips or, if you have sight, by looking closely at the pattern. The Signs, Signals, and Codes merit badge helps Scouts learn how braille works and how it helps people communicate.
The braille cell has two columns and three rows. Each dot has a number from 1 to 6. Different combinations of these dots stand for each letter of the alphabet. For example, the letter A is just one dot in the upper left position (dot 1). The letter B is dots 1 and 2. The full braille alphabet fits into these simple patterns, making it easier to learn through practice.
- a: dot 1
- b: dots 1 and 2
- c: dots 1 and 4
- d: dots 1, 4, and 5
- e: dots 1 and 5
- f: dots 1, 2, and 4
- g: dots 1, 2, 4, and 5
- h: dots 1, 2, and 5
- i: dots 2 and 4
- j: dots 2, 4, and 5
- k: dots 1 and 3
- l: dots 1, 2, and 3
- m: dots 1, 3, and 4
- n: dots 1, 3, 4, and 5
- o: dots 1, 3, and 5
- p: dots 1, 2, 3, and 4
- q: dots 1, 2, 3, 4, and 5
- r: dots 1, 2, 3, and 5
- s: dots 2, 3, and 4
- t: dots 2, 3, 4, and 5
- u: dots 1, 3, and 6
- v: dots 1, 2, 3, and 6
- w: dots 2, 4, 5, and 6
- x: dots 1, 3, 4, and 6
- y: dots 1, 3, 4, 5, and 6
- z: dots 1, 3, 5, and 6
To spell the name Jack in braille:
- J: dots 2, 4, 5
- A: dot 1
- C: dots 1, 4
- K: dots 1, 3
These dots can be printed on thick paper for touch reading or drawn as dot patterns on paper for sight reading. Braille can also be read using special tools or computer displays that raise and lower dots under your fingers.
Scouts working on the Signs, Signals, and Codes merit badge must also decode a message at least six words long. Here’s an example of a braille message written out using dot numbers (for sight reading):
Dots:
2-4-5, 1, 1-4, 1-3, 1-3-5, 1-2, 1-3, 1-2-3-5, 1-2, 1-3
This translates to: Jack is a Scout who helps others
Decoding braille takes time and attention. Whether you read it by touch or sight, it helps you understand how important it is to have ways to share messages with everyone. Braille gives people who are blind access to books, signs, and even menus.
The Signs, Signals, and Codes merit badge gives Scouts a chance to practice this system and understand its importance. Learning braille builds patience, awareness, and a greater understanding of how others experience the world. It is also a great way to support inclusion in Scouting and beyond.
Requirement 6: Sound and Silent Signals
Do the following:
- Describe to your counselor six sound-only signals that are in use today. Discuss the pros and cons of using sound signals versus other types of signals.
- Demonstrate to your counselor six different silent Scout signals. Use these Scout signals to direct the movements and actions to direct the movements and actions of your patrol or troop.
Signs, Signals, and Codes Merit Badge Requirement 6 Helps and Answers
When You Can’t Be Seen
Sound-only signals are used when visual signals won’t work. These are signals you can hear but not see. They are important in noisy places, low visibility, or when people are far apart. The Signs, Signals, and Codes merit badge teaches Scouts about different types of sound signals and how to use them.
Here are some common sound-only signals in use today:
- Train whistle – A long–long–short–long blast warns that a train is coming to a crossing.
- Fire alarm – A loud bell or horn that repeats to signal a fire emergency.
- Ambulance or police siren – A wailing sound that tells traffic to move out of the way.
- School bell – A single ring to start or end classes.
- Car horn – A short honk to get someone’s attention or avoid danger.
- Boat horn – Used in fog or to signal turns and stops on the water.
Sound signals are useful because they can reach people even if they can’t see the source. For example, a foghorn can warn boats in thick fog, and a whistle can help rescuers find a lost hiker. Sound travels in all directions, so it doesn’t require a clear line of sight.
But sound signals also have limits. They may not be heard over loud background noise, like wind or engines. They can also be hard to understand if the listener is far away or has hearing problems. Some sound signals may be confused with others, especially in busy areas.
Compared to other types of signals, like visual flags or hand signs, sound signals are fast and simple. But they don’t work well when silence is needed or when people are trying to listen for other things. That’s why it’s important to pick the best signal type for the situation.
Scouts working on the Signs, Signals, and Codes merit badge learn to think about which signals will work best in the moment. Sound signals are a great option when you need to act quickly and can’t be seen, but they should be used with care and clear meaning.
Leading Without a Word
Silent Scout signals are hand and arm movements used to guide a group without speaking. These signals help a Scout leader give clear instructions when quiet is needed. They are useful during hikes, ceremonies, service projects, or in areas where talking might disturb others. The Signs, Signals, and Codes merit badge includes these signals so Scouts can learn how to lead using simple, quiet actions.
These signals are part of the traditional Scout skill set. They are easy to learn and don’t require special tools. Every Scout in a patrol or troop should know them so they can respond quickly when needed. Practicing them regularly helps the group move as a team, even in busy or quiet settings.
Here are some common silent Scout signals and what they mean:
- Hand raised straight up – Stop and stay quiet
- Arm extended forward, palm down, move hand downward – Sit down
- Arm extended forward, palm up, move hand upward – Stand up
- Arm pointing in a direction – Go that way
- Hand making a circular motion above head – Gather in close or form a circle
- Pointing to eyes, then to another person or object – Look over there
These signals work best when everyone can see the leader. The leader should make the movements clear and slow enough for the group to understand. Sometimes a Scout leader will hold the signal until they see others start to follow it.
Silent signals are helpful in many situations. On a hike, the leader might raise their hand to stop the group if there’s a hazard ahead. During a campfire ceremony, a quiet sit-down signal helps everyone settle quickly without shouting. These small actions can make a big difference in group safety and focus.
As part of the Signs, Signals, and Codes merit badge, Scouts not only learn the signals but practice using them. This helps build confidence and teamwork. When Scouts use silent signals well, the whole group runs more smoothly, especially during outdoor adventures. Being able to lead quietly is a skill every Scout can use.
Requirement 7: Trail Sign Hike
On a Scout outing, lay out a trail for your patrol or troop to follow. Cover at least one mile in distance and use at least six different trail signs and markers. After the Scouts have completed the trail, follow the Leave No Trace Seven Principles and the Outdoor Code by replacing or returning trail markers to their original locations.
Signs, Signals, and Codes Merit Badge Requirement 7 Helps and Answers
Leave a Trail, Then Clean It Up
Trail signs are marks or symbols made on the ground, trees, or rocks to guide others along a path. These signs can show direction, give warnings, or leave messages. Scouts often use trail signs during hikes or games. As part of the Signs, Signals, and Codes merit badge, Scouts learn how to use these signs to help a patrol or troop follow a planned trail.
Trail signs are made with natural materials like sticks, stones, or leaves. You can also draw them in the dirt with a stick. Each shape or design has a meaning. A simple arrow made with sticks might mean “go this way.” A circle of stones might mean “stop.” To set up your trail, choose a safe outdoor area and plan a route that is at least one mile long.
Here are some examples of trail signs you can use:
- Arrow made of sticks or stones – Go in the direction it points
- Two stones side by side – Turn left
- Three stones in a triangle – Danger ahead or be careful
- Stick stuck upright in the ground – Stop here
- Small pile of leaves with an item under it – Message or clue hidden
- Broken twig with point turned down – Trail ends here
Once your trail is ready, let your patrol or troop follow it without your help. They should use the trail signs to move from one point to the next. Make sure the path is safe and easy to follow. You can also leave fun clues or tasks along the way.
After the activity, clean up the trail. Follow the Leave No Trace Seven Principles. These include respecting nature, staying on trails, and leaving what you find. Return sticks, stones, and leaves to where they came from. This keeps the area natural for animals and other hikers. Also follow the Outdoor Code by being clean, careful, and considerate outdoors.
The Signs, Signals, and Codes merit badge helps Scouts learn how to use symbols in the outdoors. Trail signs teach you how to guide others quietly and clearly. They are useful for games, search-and-rescue drills, or just practicing Scout skills on a hike. This requirement also reminds you to care for the outdoors while you learn.
Requirement 8: Action Signals
For THREE of the following activities, demonstrate five signals each. Tell what the signals mean and why they are used:
- Sports official’s hand signs/signals
- Heavy-equipment operator’s hand signals
- Aircraft carrier catapult crew signals
- Cyclist’s hand signals
- An activity selected by you and your counselor.
Signs, Signals, and Codes Merit Badge Requirement 8 Helps and Answers
Ref Signals That Call the Game
Sports officials use hand signs to help players, coaches, and fans understand what is happening during a game. These signals give clear instructions without needing to speak. Referees and umpires in many sports use hand signs to show fouls, scores, timeouts, and other important calls. As part of the Signs, Signals, and Codes merit badge, Scouts learn how these visual signals help sports run smoothly.
Each sport has its own set of hand signs. For example, in basketball, a referee might raise one hand to stop the clock or point to show which team has the ball. In football, an official might cross both arms in front of the chest to signal pass interference. These signs make sure everyone knows the call, even if they are far away or in a loud stadium.
Here are some examples of sports official hand signals and what they mean:
- Football – Touchdown: Both arms raised straight up
- Basketball – Traveling: Rotate fists around each other in front of chest
- Baseball – Safe: Arms extended sideways
- Soccer – Direct free kick: Arm pointed straight forward
- Volleyball – Double contact: Raise two fingers from one hand
Sports officials use these signals to keep the game fair and clear. If a player breaks a rule, the official gives a signal right away so everyone sees it. This keeps confusion low and makes the game move forward without long delays. These signals also help people who cannot hear the whistle or the call.
Knowing how these signals work can help Scouts become better players and leaders during sports and games. It also shows how signs can be a powerful way to communicate without sound. Just like in the rest of the Signs, Signals, and Codes merit badge, it’s all about using clear signals that others can understand fast.
Scouts can practice these hand signs with their patrol or troop during a meeting. Try acting out a few referee calls and guessing what they mean. You might also watch a game and look for signals in action. This is a fun way to learn how signs are used in real life and how they help teams and players stay on track.
Staying Safe Around Big Machines
Heavy equipment operators use hand signals to stay safe on the job. These are clear movements used by a person called a spotter to guide the operator of a machine like a bulldozer, crane, or forklift. The spotter gives signals so the operator knows when to move, stop, or lift. These signals help prevent accidents and injuries. The Signs, Signals, and Codes merit badge teaches Scouts about this important system of silent communication.
In many jobs, the operator cannot see clearly behind or beside the machine. A spotter stands where they can see the area and gives hand signals. These movements must be clear and easy to understand from a distance. Both the spotter and the operator must agree ahead of time on which signals will be used. In some work areas, using hand signals is required by safety rules.
Here are five common heavy equipment hand signals:
- Stop – Arm raised with palm facing outward
- Move forward – Arm motioning forward in a sweeping motion
- Move in reverse – Arm motioning backward in a sweeping motion
- Raise load – Arm bent upward with hand making an upward motion
- Lower load – Arm bent downward with hand making a downward motion
These hand signals keep everyone safe. Loud engines or long distances make it hard to hear spoken instructions, so clear hand movements work better. A good spotter always stands in a safe place where they can be seen and never turns their back to the machine. The operator must watch the spotter at all times when moving the equipment.
Scouts learning these signals for the Signs, Signals, and Codes merit badge will understand how important clear, silent communication is on job sites. These signals are used every day in road work, construction, and loading areas. Practicing these hand signs can help Scouts stay alert in areas with large vehicles or machines.
This is also a great way to learn about future careers. Many skilled jobs use hand signals to stay safe and work as a team. Learning this skill now helps Scouts build awareness and responsibility around safety and communication.
Launching Planes with Signals
On an aircraft carrier, the catapult crew uses hand signals to help launch planes safely. These signals are silent commands that tell the pilot and deck crew when to move, stop, or launch. Aircraft carriers are very loud and busy, so clear hand signals are the best way to communicate on the flight deck. The Signs, Signals, and Codes merit badge includes these signals to show how important they are in real-world operations.
The catapult crew wears colored shirts that show their jobs. Yellow shirts are aircraft directors who guide the planes. Green shirts work with catapults and arresting gear. Each crew member has a role, and they must follow signals exactly to keep the process safe. One mistake could lead to damage or injury. That’s why these signals must be clear and agreed on before the flight starts.
Here are some common aircraft carrier catapult crew signals:
- Start engines – Arms held above the head in a circular motion
- Spread wings – Arms out to each side, then pushed outward
- Hold brakes – Fist closed and raised
- Remove chocks – Point to wheel, then wave away
- Launch – Crouch, touch the deck, then give a sharp point forward
The final launch signal is given by the “shooter.” This is a green-shirt crew member who crouches, touches the flight deck, and points forward. That signal tells the catapult to launch the plane. The whole sequence must be smooth and done with full attention. Everyone on the deck must watch for signals and respond without delay.
These signals are not used just for speed—they are for safety. The pilot and crew cannot rely on sound because of the engine noise. Visual signals must be large and easy to see from a distance. This system helps crews work fast and safely during flight operations.
Scouts working on the Signs, Signals, and Codes merit badge can learn how important teamwork and silent signals are in high-pressure environments. Practicing these movements with a patrol is a fun way to understand the skill and focus needed on a carrier. These signals show how communication helps people work together safely, even in the most intense situations.
Signaling Your Next Move on a Bike
Cyclists use hand signals to let others know what they are about to do. These signals are required by traffic laws in many places and help keep everyone on the road safe. A simple hand movement can warn cars, other cyclists, and pedestrians about turns or stops. As part of the Signs, Signals, and Codes merit badge, Scouts learn how to use these signals clearly and correctly.
When riding a bike, it’s not always easy for others to guess what you are doing. That’s why hand signals are important. They give a clear warning before you change direction or stop. This helps avoid crashes and confusion. Every Scout who bikes should know and practice these hand signals, just like they would wear a helmet or check their brakes.
Here are five basic hand signals for cyclists:
- Left turn – Left arm straight out to the side
- Right turn – Left arm bent up at the elbow, or right arm straight out to the side
- Stop – Left arm bent down at the elbow, hand open
- Slowing down – Same as stop, but with the hand moving up and down slowly
- Hazard warning – Pointing at a pothole or hazard to alert others behind you
These signals are used before the action takes place. For example, you should signal a turn at least a few seconds before you turn. This gives cars time to slow down or move over. Always make sure the road is clear before taking your turn or changing lanes.
Hand signals must be done clearly. Use your whole arm, not just your hand, so others can see it. Make sure you are steady on your bike when signaling. Practice helps you keep control while raising one hand off the handlebars. On busy streets or in a group ride, these signals become even more important.
The Signs, Signals, and Codes merit badge helps Scouts understand that signals are not just for talking—they are for safety too. Using hand signals while biking shows responsibility and respect for others on the road. It’s a small skill that can make a big difference in preventing accidents.
Requirement 9: Everyday Symbols
Share with your counselor 10 examples of symbols used in everyday life. Design your own symbol. Share it with your counselor and explain what it means. Then do the following:
- Show examples of 10 traffic signs and explain their meaning.
- Using a topographical map, explain what a map legend is and discuss its importance. Point out 10 map symbols and explain the meaning of each.
- Discuss text-message symbols and why they are commonly used. Give examples of your favorite 10 text symbols or emoticons. Then see if your parent, guardian, or counselor can identify the meaning or usage of each symbol.
Signs, Signals, and Codes Merit Badge Requirement 9 Helps and Answers
Everyday Symbols All Around Us
Symbols are simple pictures or signs that stand for something else. They are used all around us to give information quickly without using words. Road signs, warning labels, and logos are all examples of symbols. As part of the Signs, Signals, and Codes merit badge, Scouts learn how to recognize these signs and understand their meanings.
You see symbols every day. A red octagon means stop. A skull and crossbones means poison or danger. A blue circle with a white wheelchair means accessible parking. These symbols work well because they are easy to recognize, even from far away or while moving fast. Many symbols are the same around the world, so people from different places can understand them.
Here are examples of everyday symbols:
- Stop sign – tells drivers to stop
- Exit sign – shows the way out of a building
- Restroom signs – show where the bathrooms are
- Recycling symbol – shows where to put items for recycling
- No smoking sign – shows where smoking is not allowed
- First aid symbol – shows where help or supplies are found
- Power button symbol – found on electronics
- Crosswalk symbol – shows a place where people can cross the street
- Poison warning label – alerts to harmful chemicals
- Heart symbol – often used to show care or health
For the Signs, Signals, and Codes merit badge, Scouts also create their own symbol. Think about what message you want your symbol to give. It should be simple, easy to draw, and easy to understand. For example, you could design a symbol to remind Scouts to pick up trash or to show a meeting point for your patrol. Use shapes, lines, or colors to make it clear.
Once you make your symbol, share it and explain what it means. You could draw a picture of a tent with a star above it to mean “Scout camp starts here.” Or make a circle with two arrows pointing in different directions to mean “choose your path.” A good symbol can help others find their way or make a smart choice.
Scouts learn from this part of the Signs, Signals, and Codes merit badge that communication isn’t always about speaking. Symbols help us share ideas without words. Designing your own symbol helps you think about what makes a message easy to understand.
Signs That Keep Roads Safe
Traffic signs are symbols placed along roads to help drivers, cyclists, and walkers stay safe. They give important information quickly using colors, shapes, and symbols. You don’t need to read a full sentence to understand a stop sign or a speed limit. The Signs, Signals, and Codes merit badge teaches Scouts how these signs work and why they matter.
Traffic signs are divided into types. Regulatory signs give rules, like speed limits or no parking zones. Warning signs alert people about dangers ahead, like curves or animal crossings. Guide signs help with directions, like showing the way to a city or park. Each sign follows a style that makes it easy to understand while moving.
Here are examples of traffic signs and what they mean:
- Stop sign – Red octagon; means the driver must come to a full stop.
- Yield sign – Red and white triangle; means slow down and give the right of way.
- Speed limit sign – White rectangle with numbers; shows the maximum speed allowed.
- No U-turn – Circle with a U arrow crossed out; means drivers cannot turn around.
- Pedestrian crossing – Yellow diamond with a person walking; warns of people crossing ahead.
- School zone – Yellow pentagon with two people; slow down near schools.
- Slippery when wet – Yellow diamond with a swerving car; the road can be slippery.
- Merge – Yellow diamond with two lines coming together; traffic is joining the lane.
- Deer crossing – Yellow diamond with a deer; watch for animals crossing the road.
- Railroad crossing – White X with the words “Railroad Crossing”; warns of train tracks.
Each of these signs helps people make good choices on the road. Some use words, but most rely on pictures. This is helpful for young drivers, visitors from other countries, or people who might not read well. The shapes and colors are easy to remember, which makes them work even at high speeds.
As part of the Signs, Signals, and Codes merit badge, Scouts look at these traffic signs and learn their meanings. Knowing these signs helps Scouts become safer bike riders, passengers, and future drivers. It also helps you notice how symbols are used every day to share clear and helpful messages.
Learning to Read the Land
A topographical map is a special kind of map that shows the shape of the land. It uses contour lines to show hills, valleys, and flat areas. These maps also show features like rivers, trails, roads, and buildings. To understand these details, you need to use the map legend. The Signs, Signals, and Codes merit badge teaches Scouts how to use the map legend and read these symbols.
A map legend is a small chart printed on the side or bottom of the map. It explains what the symbols and colors mean. Without the legend, it would be hard to tell what different lines, shapes, and marks stand for. Some maps use the same symbols, but it’s always smart to check the legend just in case something is different.
Here are symbols commonly found on a topographic map and what they mean:
- Contour line – Thin brown line showing elevation and shape of the land
- Index contour – Thicker brown line with a number showing the height
- Stream or river – Blue line that shows flowing water
- Lake or pond – Blue shape that shows still water
- Trail – Dashed black line used for walking or hiking paths
- Road – Solid or double line, often black or red, for vehicle travel
- Railroad – Parallel lines with short cross-marks
- Building – Small black square or rectangle
- Campground – Triangle with a dot in the center
- Forest or wooded area – Green shading
Each of these symbols gives useful information to hikers, campers, and anyone planning to explore an area. Contour lines show whether the land is flat or steep. Blue lines and shapes help you find water. Symbols like trails and campgrounds make it easier to plan a safe and fun route.
For the Signs, Signals, and Codes merit badge, learning to use a map legend is a useful skill. It teaches you how to read maps clearly and understand what each part means. Whether you’re on a hike, planning a service project, or working on orienteering, knowing these symbols can help you find your way and stay safe. Reading a map is just another way Scouts use signs and codes to understand the world around them.
Smiles, Shortcuts, and Symbols
Text-message symbols are small pictures or letter combinations used to share feelings or messages quickly. These are called emoticons or text symbols. People use them to show emotions, answer fast, or save time when typing. Emoticons use keyboard characters like colons, parentheses, or slashes. Newer messages often use emojis, which are little images built into phones. The Signs, Signals, and Codes merit badge helps Scouts understand how symbols like these are used in everyday life.
Text-message symbols are common because they are simple and quick. Instead of writing “I’m happy,” someone might send a smiley face like 🙂 or 😊. These symbols help the reader know the tone of the message. That can be helpful when the message is short and might be misunderstood without some hint of emotion.
Here are common text symbols and emoticons and what they mean:
- 🙂 – Happy 😊
- 🙁 – Sad 😢
- 😉 – Wink 😉
- 😀 – Big smile 😄
- 😛 – Sticking out tongue 😛
- <3 – Heart ❤️
- XD – Laughing 😆
- :O – Surprise or shock 😮
- :/ – Unsure or mixed feelings 😕
- 😐 – No emotion or neutral 😐
These symbols are used across texts, emails, and online chats. They work as a quick code between people who know what they mean. Some people use full emojis like 🐍, 🚀, or 🌲 to add fun or show interest in something. For example, Scouts might send a tent emoji when talking about campouts.
As part of the Signs, Signals, and Codes merit badge, Scouts are asked to test these symbols with someone else. Show your parent, guardian, or counselor each symbol and ask them what they think it means. This shows how these symbols can be understood—or sometimes misunderstood—by different people.
Understanding text symbols helps you think about how messages are shaped and shared. Like road signs or map symbols, they are small but powerful ways to share meaning. Learning about these codes helps you become a stronger communicator in many settings, both online and in person.
Requirement 10: Secret Codes
Briefly discuss the history of secret code writing (cryptography). Make up your own secret code and write a message of up to 25 words using this code. Share the message with a friend or fellow Scout. Then share the message and code key with your counselor and discuss the effectiveness of your code.
Signs, Signals, and Codes Merit Badge Requirement 10 Helps and Answers
Writing in Secret
Secret code writing is called cryptography. It is the art of hiding a message so that only the right person can understand it. People have used secret codes for thousands of years. Ancient Egyptians and Greeks used simple letter swaps. Julius Caesar used a famous code where each letter was moved forward by three letters in the alphabet. This is now called the Caesar cipher. The Signs, Signals, and Codes merit badge teaches Scouts how codes work and how to create their own.
In the past, secret codes helped armies send battle plans and allowed spies to pass messages. During World War II, very complex codes were used to send orders by radio. Some of these took teams of people and early computers to figure out. Today, computer codes keep passwords and banking details safe. But even a simple homemade code can still be useful and fun.
A code is different from a symbol or signal because it changes the letters or words of the message itself. For example, if A becomes D, B becomes E, and so on, then “HI” becomes “KL.” This type of code has a pattern or key that the person decoding it needs to understand the message.
For the Signs, Signals, and Codes merit badge, Scouts create their own code and test it with someone else. Here’s an example of a simple code: Reverse Alphabet Code. In this code, A becomes Z, B becomes Y, C becomes X, and so on.
Code Key:
A=Z, B=Y, C=X, D=W, E=V, F=U, G=T, H=S, I=R, J=Q, K=P, L=O, M=N
N=M, O=L, P=K, Q=J, R=I, S=H, T=G, U=F, V=E, W=D, X=C, Y=B, Z=A
Secret Message (25 words):
Gsv zgyzhs szh xlfih gsv droo yvhg rm gsv xzoo. R szh gsv ivzw xzm gsv Mldsl!
Translation:
The patrol has coded the week first in the camp. I has the best fun the Night!
After making a code, try sending it to a fellow Scout. See if they can solve it with the code key. Then show both the code and the key to your counselor. Talk about how easy or hard it was to figure out. This part of the Signs, Signals, and Codes merit badge helps you think about how messages can be kept secret—or discovered with effort and clues.
Resources

Morse Code Interpreter Strip
The Morse Code interpreter strip is a patch Scouts and leaders can wear to show they can send and receive Morse Code. It is open to everyone in Scouting and does not require a specific rank or age. Scouts must practice and show their skills, but there is no official form or approval process.
Scouts working on the Signs, Signals, and Codes merit badge may also enjoy earning this strip. It builds on what they learn in the badge and gives them another way to use Morse Code. It encourages patience, focus, and independent learning in a simple and fun way.

Secret Codes for Scouts
Secret codes help Scouts build communication and thinking skills. They turn learning into a game. Scouts can try Pig Latin, Ubbi Dubbi, or Morse Code. Each one has simple rules and can be used during meetings, hikes, or campouts. Scouts can also create their own codes, which helps with teamwork and creativity.
This activity connects well with the Signs, Signals, and Codes merit badge. Scouts practice sending messages in fun and different ways. They also build problem-solving and listening skills. These codes encourage Scouts to pay attention and work together while having fun and learning something new.

More Merit Badge Resources
The merit badge program helps Scouts explore different skills and interests. Some badges teach outdoor skills, others focus on science, careers, or communication. Each badge lets Scouts try something new and grow in knowledge and confidence. Scouts work with a counselor who helps them understand the topic and reach their goals.
The Signs, Signals, and Codes merit badge fits in by showing how people communicate without words. It combines history, creativity, and useful skills in a fun way. Like many badges, it gives Scouts a chance to learn in an active, hands-on way while building a better understanding of the world.

Learn More about Scouts BSA
The Scouts BSA program helps youth grow in leadership, fitness, citizenship, and personal development. Merit badges support this by giving Scouts chances to explore new skills. They also help Scouts learn responsibility, follow instructions, and work with others.
The Signs, Signals, and Codes merit badge supports the program by building clear communication skills. Scouts learn to pay attention, give directions, and think about how others understand messages. These skills support leadership and teamwork, both in Scouting and in everyday life.
Frequently Asked Questions for the Signs, Signals, and Codes Merit Badge
What is the Signs, Signals, and Codes merit badge about?
This merit badge teaches Scouts how people communicate without speaking. It covers things like Morse code, American Sign Language, trail signs, and secret codes.
Do I have to learn Morse code for the Signs, Signals, and Codes merit badge?
Yes. You will learn how to spell your name using Morse code and send or receive a short message.
Is American Sign Language part of the requirements?
Yes. You will spell your name using ASL and send or receive a short message. You do not have to learn full sentences.
What is semaphore?
Semaphore is a system that uses two flags. You hold them in different positions to stand for letters. You will practice using it as part of this merit badge.
What are trail signs?
Trail signs are marks made with sticks, stones, or drawings to guide others. You will make a one-mile trail using at least six different signs.
Do I have to hike for this badge?
Yes, for the trail sign activity. You will set up a trail at least one mile long for your patrol or troop.
Do I need to know the braille alphabet?
Yes. You will learn to read and write short messages using braille. You can do this by sight or touch.
Is this badge hard?
It takes practice, but most Scouts can finish it with time and effort. It’s a fun way to learn about communication.
Can I do the Signs, Signals, and Codes merit badge with my patrol?
Yes. Many parts of the badge are fun to do in a group, like silent signals and trail signs. However, Scouts must complete requirements individually.
Who can teach this merit badge?
A registered merit badge counselor. Ask your Scoutmaster to help you find one.
Say It Without Speaking
The Signs, Signals, and Codes merit badge is all about learning how to share information without talking. Scouts discover how people use hand signals, symbols, and codes in different places and for different reasons. These skills help with safety, teamwork, and understanding others. From sending messages with flags to spotting warning signs on the road, this badge teaches clear and quiet communication.
Scouts get hands-on practice with Morse code, American Sign Language, braille, semaphore, and trail signs. They learn how to give and follow instructions using simple tools like sticks, flags, and hand movements. Some activities are just for fun, while others help Scouts learn skills used in real jobs or emergencies.
There’s also a creative side. Scouts make their own secret codes and symbols. They get to test them with friends and talk about how well they work. The Signs, Signals, and Codes merit badge is great for Scouts who enjoy puzzles, games, and learning how things work behind the scenes.
This badge helps Scouts build strong skills in observation, leadership, and problem-solving. It also helps them notice how people around them are always using signs, even when they aren’t saying a word. Whether you’re on a hike, in a crowd, or just texting a friend, the skills you learn in this badge will come in handy.
Leave a Reply