
Some Native Americans who lived on the Great Plains lived in tipis. These dwellings were typically made of animal hides stretched over wooden poles. Tipis can be disassembled and moved, making them an ideal dwelling for nomadic tribes. In fact, the word tipi comes from the Lakota word for dwelling – thipi.
Native American lore has always been incorporated into American Scouts BSA and Cub Scout programs. Scouts who are doing a Native American themed meeting or activity can create a simple tipi model to get the idea of how these versatile dwellings are constructed. We made these at a Cub Scout training session and they were very easy.
Tabletop Tipi Model
Use this hands on activity to introduce a lesson on Native American cultures.
Materials for Tabletop Tipi Model
- 4 straight sticks each about 12 inches in length
- rubber band or string
- ruler
- pencil
- cardboard or heavy card stock
- 1 brown paper bag
- scissors
- markers or colored pencils
How to make a Tabletop Tipi Model
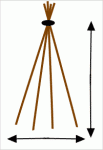


- First, gather four straight sticks.
- Gather the sticks together and bind them together a few inches from the top with a rubber band or string.
- Spread out the sticks at the bottom to form the frame for the tipi.
- Measure the approximate size of one side of the tipi.
- Cut a triangle out of cardboard approximately the same size as the side of the tipi.
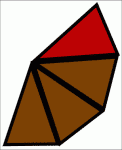
- Use the cardboard stencil to draw four adjacent triangles on the paper bag as shown
- Cut out the adjacent triangles all as one piece.
- Cut a door at the bottom of one of the sides.
- Decorate the paper if you want to.
- Crease the paper along the sides of the triangle and fold together.
- Snip just a little bit off of the top, so there is room for the sticks to poke through.
- Put the paper sides on top of the stick frame and tape together.

Related Resources
Native American Prayer
This beautiful Native American prayer is attributed to Chief Sealth (for whom Seattle is named).
Native American Games
See three games you can play with Scouts. One is a board game, one is a dice game, and the third is a field game.
Be Respectful of Native American Culture
Before discussing Native American traditions or imitating them, think about how your words and actions reflect on the culture and be knowledgeable about how they might be interpreted.
Leave a Reply