
Hiking Stick Project
In Scouting, making things with your hands is a big part of learning and growing. One simple but fun project is making a hiking stick. It gives Cub Scouts a chance to use their pocketknives in a safe and meaningful way. This also helps them build confidence and learn useful outdoor skills.
This project is a great way to practice knife safety. Scouts get to strip bark, smooth wood, and shape their own gear. It’s important that they understand safety while using their knives, and this project gives them a reason to follow the rules carefully.
Making a hiking stick also gives Scouts something to take on hikes and camping trips. They can use it for balance, to clear brush, or just to look cool with something they made themselves. It becomes a part of their outdoor adventures.
Some packs and dens even add special touches. One den gave their Den Chief a stick with all their names burned into it. Years later, he still keeps it as a favorite memory. That shows how a small project can mean a lot.
Sticks Through the Ages
People have been using walking sticks for a very long time. Long before sidewalks and paved roads, travelers needed help walking over rough ground. A sturdy stick gave them balance, support, and sometimes even protection from animals or trouble.
In some places, walking sticks became special symbols. Shepherds used them to guide sheep. Kings carried fancy ones called scepters. Hikers and explorers used them to climb mountains and cross rivers. Over time, people started carving designs into them or adding decorations to show where they had been.
In Scouting, the walking stick fits right in. It’s useful on the trail, and it’s a chance to make something with your hands. Scouts often carve their names or add beads and patches for each hike or campout. It becomes part of their story.
So next time you see a stick on the ground, remember—it might just be the start of a great adventure.
More Than Just a Stick to Hold
Den leaders, this is a project where your Scouts will learn a lot without even realizing it. They’ll be having fun, but at the same time, they’ll be building useful skills. First, they’ll practice using their pocketknives safely. You can go over the knife safety rules before they start. This helps them remember to be careful and follow directions.
They’ll also build patience. Stripping bark and sanding a stick takes time. Some Scouts may rush, but you can remind them that a smooth stick takes work. This is a good way to talk about doing your best and not just finishing fast.
This project also gives them a chance to make choices. Do they want to add a leather grip? Should they burn their name into the stick? Let them be creative. They’ll feel proud of their choices and their final project.
Finally, this is something they can use. It’s not just a craft—they can take it on hikes and show it off to friends and family. That gives them a sense of pride and ownership. And for some Scouts, it might become something they keep for many years.
Hiking Stick Project Instructions
Equipment:
- Pocketknife
- Wood burning tool (optional)
- Drill (optional)
- Leather punch (optional)
Materials:
- Sturdy stick (about 4 feet long; oak works well)
- Sandpaper
- Piece of leather (optional)
- Leather lacing (optional)
- Shoelace (optional)
Instructions:
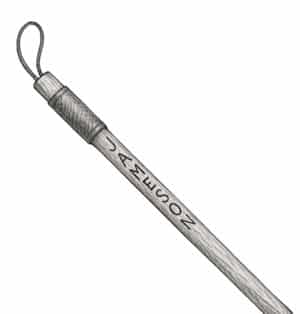
- Choose a strong, straight stick about 4 feet long. It should be dry and not rotten.
- Use a pocketknife to carefully strip all the bark off the stick.
- Sand the stick until it feels smooth. Be sure to remove any rough spots or splinters.
- (Optional) Use a wood burning tool to burn your name or designs into the stick.
- (Optional) To add a leather grip:
- Cut a piece of leather so it wraps around the stick.
- Punch holes in both ends of the leather.
- Wrap it around the stick and lace it up with leather cord.
- (Optional) Drill a hole near the top of the stick and thread a shoelace through it. Tie a knot. This lets you hang it up when not in use.
Safety Notes:
- Always review knife safety rules before starting.
- Only Scouts with their knife safety training should use pocketknives.
- Adult help is needed for tools like wood burners or drills.
- Keep a first aid kit nearby just in case.
Variations:
- Add paint, beads, or stickers for decoration.
- Glue on badges or patches from hikes.
- Use paracord instead of leather for the handgrip.
Each Scout’s stick will be different, and that’s part of the fun!

More Resources

Projects for Scouts
If your Scouts enjoyed making a walking stick, there are many other hands-on projects they might like too. These kinds of activities help Scouts build skills and feel proud of what they’ve made. You can find more simple and fun ideas that work well for Cub Scouts and older Scouts on my website.
Visit my Projects for Scouts page to explore other project ideas. There are crafts, camp gadgets, and outdoor skills to try with your den or troop. These projects are easy to follow and help keep Scouts engaged.

Frequently Asked Questions about the Walking Stick Project
Do I need a special kind of stick?
No, but it should be strong, straight, and about 4 feet long. Oak works well. Make sure it is dry and not rotten.
Can Scouts use pocketknives for this project?
Yes, but only if they have learned knife safety. Always go over the rules before they begin. An adult should supervise.
What if we don’t have wood burning tools?
That part is optional. Scouts can use markers, paint, or just leave the stick plain.
Can younger Scouts do this?
Yes, with help. They may need adults or older Scouts to assist with sanding or cutting leather.
Is sanding really important?
Yes. Sanding removes splinters and makes the stick safe and smooth to hold.
How do we add a handle grip?
Wrap a piece of leather around the stick, punch holes in the ends, and lace it together. You can also use paracord.
What can we use to hang it up?
Drill a hole near the top and thread a shoelace through it. Tie a knot to make a loop.
Can we decorate the stick more?
Yes! Add paint, stickers, beads, or patches. Let Scouts be creative.
How long does this project take?
About 30 to 60 minutes, depending on how many extras you add.
Can this be used for a hiking activity?
Yes. Scouts can take their sticks on hikes and show off what they made.
Stick With It
The walking stick project is a fun and useful activity for Scouts. It gives them a chance to use their pocketknives and practice knife safety. Scouts enjoy stripping the bark, sanding the wood, and making something they can actually use on hikes and campouts.
This project also helps Scouts build patience. It takes time to make a smooth, strong hiking stick. Some may want to rush, but they learn quickly that a good result takes steady work. And at the end, they’ll have something they made with their own hands.
There are lots of ways to personalize the stick. Scouts can add their names with a wood burner, wrap a leather grip, or drill a hole to add a loop for hanging. They can also paint or decorate the stick to show their style or mark their adventures.
Many Scouts keep their sticks for years. It becomes a piece of their Scouting story. Some even collect hiking sticks from different camps or events. This project isn’t just fun—it gives them something they’ll use and remember.
Leave a Reply